This is the very first fairy door that I built. After taking the walking tour of the Urban Fairy Doors of Ann Arbor, I decided to build this door for my friend Mary.
The inner door is partially open and I installed a battery operated light inside so that when the light is on it streams out around the edge of the door and through the storm door "windows".
Little did I know at the time that this door would lead me to build over 30 fairy doors. I love doing them and don't plan on stopping any time soon.
Hope you enjoy them as much as I enjoy making them.
Monday, April 23, 2012
Christmas Door - #2
This a stained door much like the one I built for Glenn and Jeannie. Some of the details are different. I also carved the wreath and bow from modeling foam. It is about an inch or so across.
Arched Top Door - #3
This is the first door that I built with the turned foam arch top. The second was the Victorian Door siamesed with the Volksrods Garage Door. The rest of the door is balsa with copper hardware. There is a transom window inside of the arch. Built for my friend Mary.
Center Knob Door - #4
The inspiration for this door came from a trip I made to England for Ford. I saw lots of doors over there with the door knob in the center of the door. This is another door I built for my friend Mary. The basic structure and door is balsa. The acorn is carved from modeling foam. The hardware is all copper including the house number.
The fairies even had milk delivered.
The fairies even had milk delivered.
Horton Hears a Who Door - #5
 First try at some stained glass. Just some "Sharpie" lead work and color on clear plastic. Balsa wood construction with copper hardware, including a mail slot and deadbolt. The round window was fun to do.
Interesting surprise with this door...if you look in the lower right hand corner...
The fairy door has a fairy door!
Thus the Horton reference.
Pokey Creations Door - #6
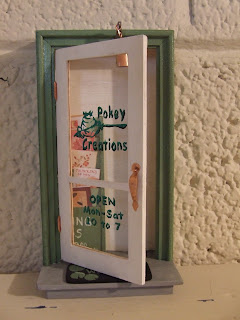
This is a fun door to do. My friend Mary creates custom greeting cards under the name "Pokey Creations" so I made up this little store front door and display stand for the fairy sized outlet. The shipping crate contained a gift from the fairies. A hand carved rubber stamp with the Pokey Creations logo on it.
The logo and lettering is all reverse painted on the back of the door "glass". Hardware is copper.
Even has a small copper bell to let them know when they get a customer.
Little closer view of the overall door. There is even a rack inside to display the fairy sized greeting cards.
Here is a close up shot of the shipping crate and stamp.
Christmas Door - #7
1850s Door - #8
This is the first stained door that I built. It is a scale replica of the 150 year old doors in my friends Glenn and Jeannie's old farm house, including the door knob and hinges.
With the stained doors you have to cut and dry fit all the pieces first, then stain them, and them assemble the door. The CA glue (super glue) that use soaks through the balsa wood easily and then the stain doesn't take to the wood uniformly. The glue effectively seals the wood.
I know I have some more detailed pictures of this one on the computer somewhere.
Mushroom Doors - #33 & 34
This is a pair of doors that I did on commision for the 4 and 1-1/2 year old daughters of a friend of the family in Minnesota. Their mom wanted colorful, whimsical doors that matched the girls' rooms and personalities. From her comments, I think I nailed it. Looking forward to hearing about the girls reactions.
Both doors are built from balsa and hand painted. The hardware is all copper. The polka dot mushrooms are carved from modeling foam and hand painted. The stained glass windows are clear plastic with "Sharpie" lead work and colors.
Jill and I built the lights from some of her jewelry making baubles and bits.
These doors even have glow-in-the-dark fairy dust buried in the clear coat. You can see the swirls of it in this and the previous picture.
A shot from below showing the details carved into the bottoms of the mushrooms. I will post some pics after the fairies get the doors installed in their new homes.
Therapy Door - #32
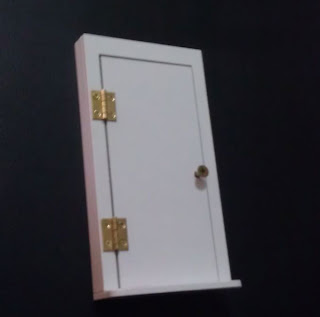
This is simple little door that I built for Jill to use in a therapy session with one of her younger clients. The client had all kinds of markers and paint and baubles and stickers to decorate the door as she saw fit....thus the basic white "canvas" to start with.
Interesting thing about this door is I laid out the design in Adobe Illustrator and the then cut the pieces from hardboard (a bit more robust for little hands than balsa wood) on the laser cutters at TechShop-Detroit.
I will post some pictures of the decorated door when I get them.
Interesting thing about this door is I laid out the design in Adobe Illustrator and the then cut the pieces from hardboard (a bit more robust for little hands than balsa wood) on the laser cutters at TechShop-Detroit.
I will post some pictures of the decorated door when I get them.
Subscribe to:
Posts (Atom)


